Prevent Report Discrepancies: Hold Yourself and Your Data Accountable with Date Change Log Management in HubSpot
Learn how to set up workflows that track every change to Close Dates, ensuring accurate reporting, transparency, and efficiency. Say goodbye to chaotic and confusing reports!

The Preventative Nightmare by Implementing Close Date Change Logs
You're a RevOps manager in 2024, gearing up for the end-of-quarter review. Your focus isn't just on projecting upcoming churn but also on meticulously reviewing last quarter's churn data and performance.
However, shortly before the review, the head of Customer Success urgently contacts you. They've noticed discrepancies in the retention report you prepared. Several accounts previously marked as retained are now shown as churned in HubSpot. Additionally, both historical and projected dates have inexplicably increased, raising concerns about data accuracy and reliability.
You realize:
Renewal statuses have changed without your awareness, jeopardizing the integrity of your retention analysis.
Real-time updates in HubSpot have altered account statuses, and you weren't notified of these changes.
Without a clear history of changes, you can't determine whether errors stemmed from
automation errors
protocol deviations by new team members
or misclassified accounts in credit card decline.
The head of Customer Success needs immediate answers to address the churn, but without visibility into the changes, you're unable to provide a clear explanation. The reliability of your retention analysis is now in question, and your ability to support customer success efforts is compromised.
In 2024, where customer retention is crucial for sustained growth, maintaining accurate and up-to-date retention data is essential. Implementing Close Date Change Logs in HubSpot is your solution:
The Solution: Implementing Close Date Change Logs
To address these challenges, let's set up workflows in HubSpot to backlog Close Dates. This allows us to keep a log of changes, including the execution date of the updates and the previous Close Date. Here’s how it helps:
📈Accurate Reporting: Ensure no surprises in your data by logging every change, enabling confident report generation.
🔍 Transparency: Easily track when and why Close Dates were adjusted, facilitating error corrections.
⏱️ Efficiency: Quickly address data discrepancies with clear logs, ensuring reliable reports.
Well that's great to know, but sounds a little time consuming to set up?
Well, if you follow these steps in your CRM; you can have this across all of your Tickets and Deals Pipelines; you may just have to spend more time adding all the change log reports you may have been missing out on… 🤷
Implementing into your HubSpot CRM
1. Create Properties:
[Date of Update] Close Date:
Purpose: Tracks the date when the Close Date was last updated. This property helps in logging and timestamping changes to ensure accurate record-keeping.
[Current] Close Date:
Purpose: Represents the current Close Date of the ticket or deal. This property is updated with the latest Close Date value after each change.
[Previous] Close Date:
Purpose: Stores the previous Close Date before any updates. This property preserves the historical Close Date values for comparison and auditing purpose
2. Build Workflows
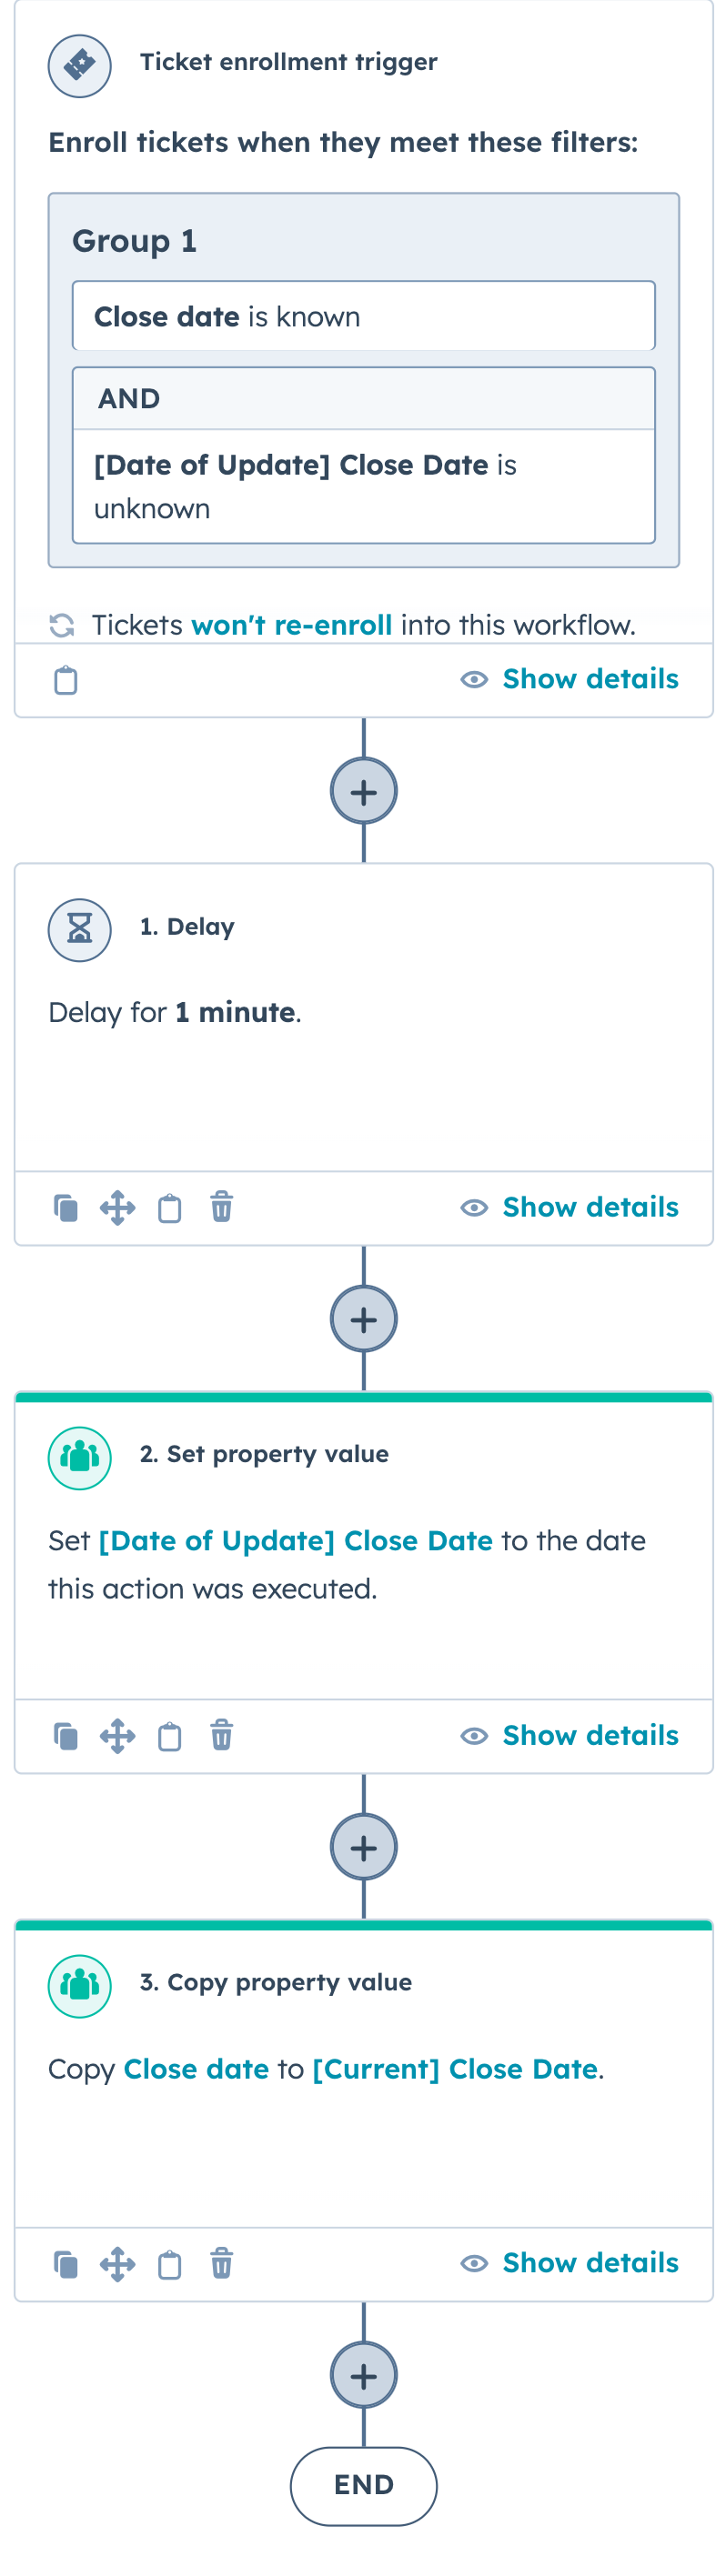
2.1 Workflow: Initial Entry of Close Date Capture and log the initial Close Date entry accurately. Setting up this trigger ensures that every new Close Date entry is timestamped for future reference and auditing.
Enrollment Trigger: Enroll tickets that meet the following criteria:
Close Date is known.
[Date of Update] Close Date is unknown.
Ensure tickets won't re-enroll in this workflow.
Delay: Delay the action for 1 minute.
Set Property Value: Set [Date of Update] Close Date to the date this action was executed.
Copy Property Value: Copy Close Date to [Current] Close Date.
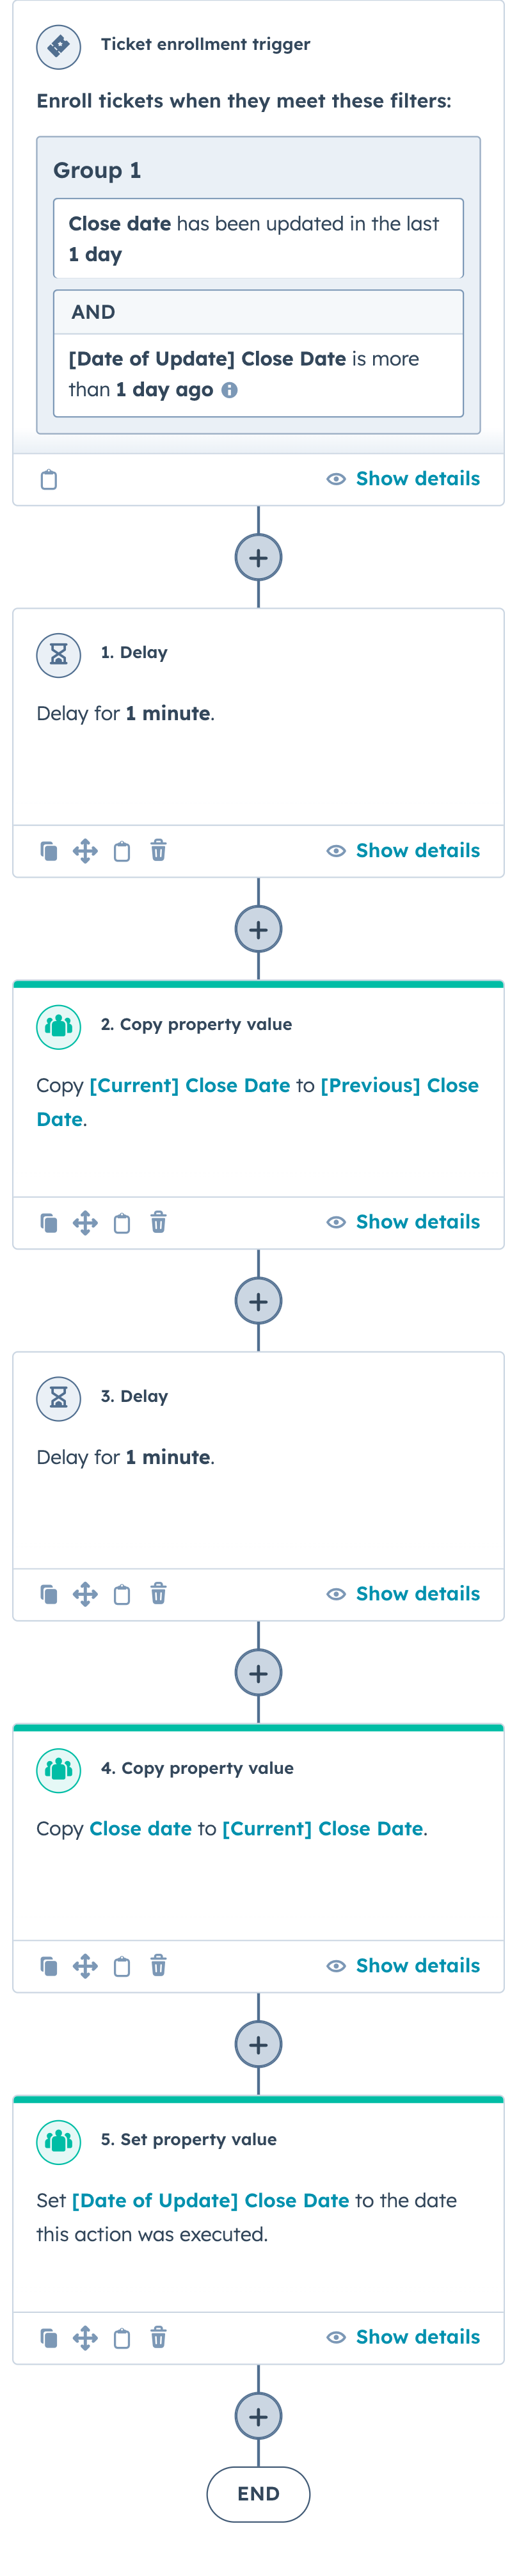
2.2 Workflow: Update and Log Changes to Close Date Track and document changes made to Close Dates. This trigger captures updates made within the last day, ensuring that each change is recorded with its previous Close Date, maintaining a transparent and traceable history of adjustments.
Enrollment Trigger: Enroll tickets that meet the following criteria:
Close Date has been updated in the last 1 day.
[Date of Update] Close Date is more than 1 day ago.
Ensure tickets WILL re-enroll in this workflow.
Delay: Delay the action for 1 minute.
Copy Property Value: Copy [Current] Close Date to [Previous] Close Date.
Delay: Delay the action for 1 minute.
Copy Property Value: Copy Close Date to [Current] Close Date.
Set Property Value: Set [Date of Update] Close Date to the date this action was executed.
Why Do We Set Delays? Setting delays in the workflows is crucial for ensuring data accuracy. Here are the primary reasons:
Buffer for Potential Mis-entries: Users may accidentally input incorrect Close Dates and correct them quickly, typically within a minute. Setting a delay (up to 5 minutes) allows time for users to rectify errors before the workflow logs the final, corrected data. Ensures only accurate information is recorded, maintaining data integrity.
Sequence of Property Value Updates: In Workflow #2, specific property values must update in a particular sequence to avoid overwriting crucial data. For example, copying [Current] Close Date to [Previous] Close Date should occur before updating [Current] Close Date with the new value. This sequential approach preserves the chronological order and integrity of Close Date changes. Implementing these delays enhances the reliability and effectiveness of our close date change logging workflows.
Why do we Trigger "Date of Update is more than 1 day ago"? This condition ensures that only changes made more than 1 day ago are logged. Immediate updates within the same day often involve minor corrections or entries that do not significantly affect reporting. By prioritizing updates beyond this timeframe, the log maintains clarity and relevance, preventing unnecessary clutter in reporting and ensuring meaningful tracking of impactful changes.
3. Build Some Reports!
Alright, now you have all the data; how do we display it?
These reports provide a clear view of current churn rates, historical context, evolution of adjustments, recent changes, and a detailed log of all account adjustments for transparent and comprehensive reporting. There are many ways to create reporting, but this can get you a sense of visualizing what we have covered.
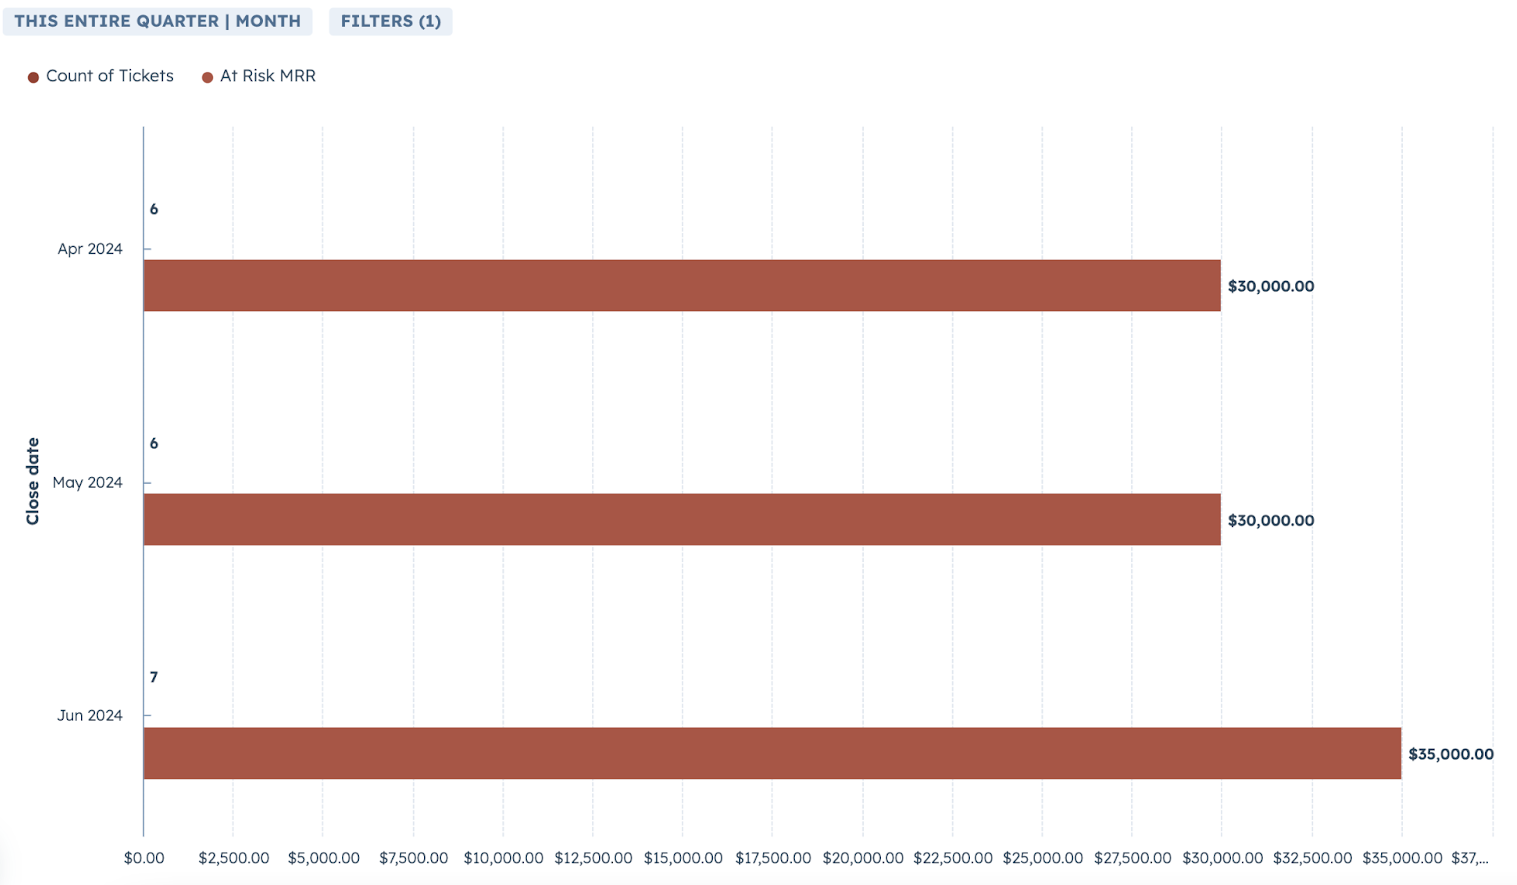
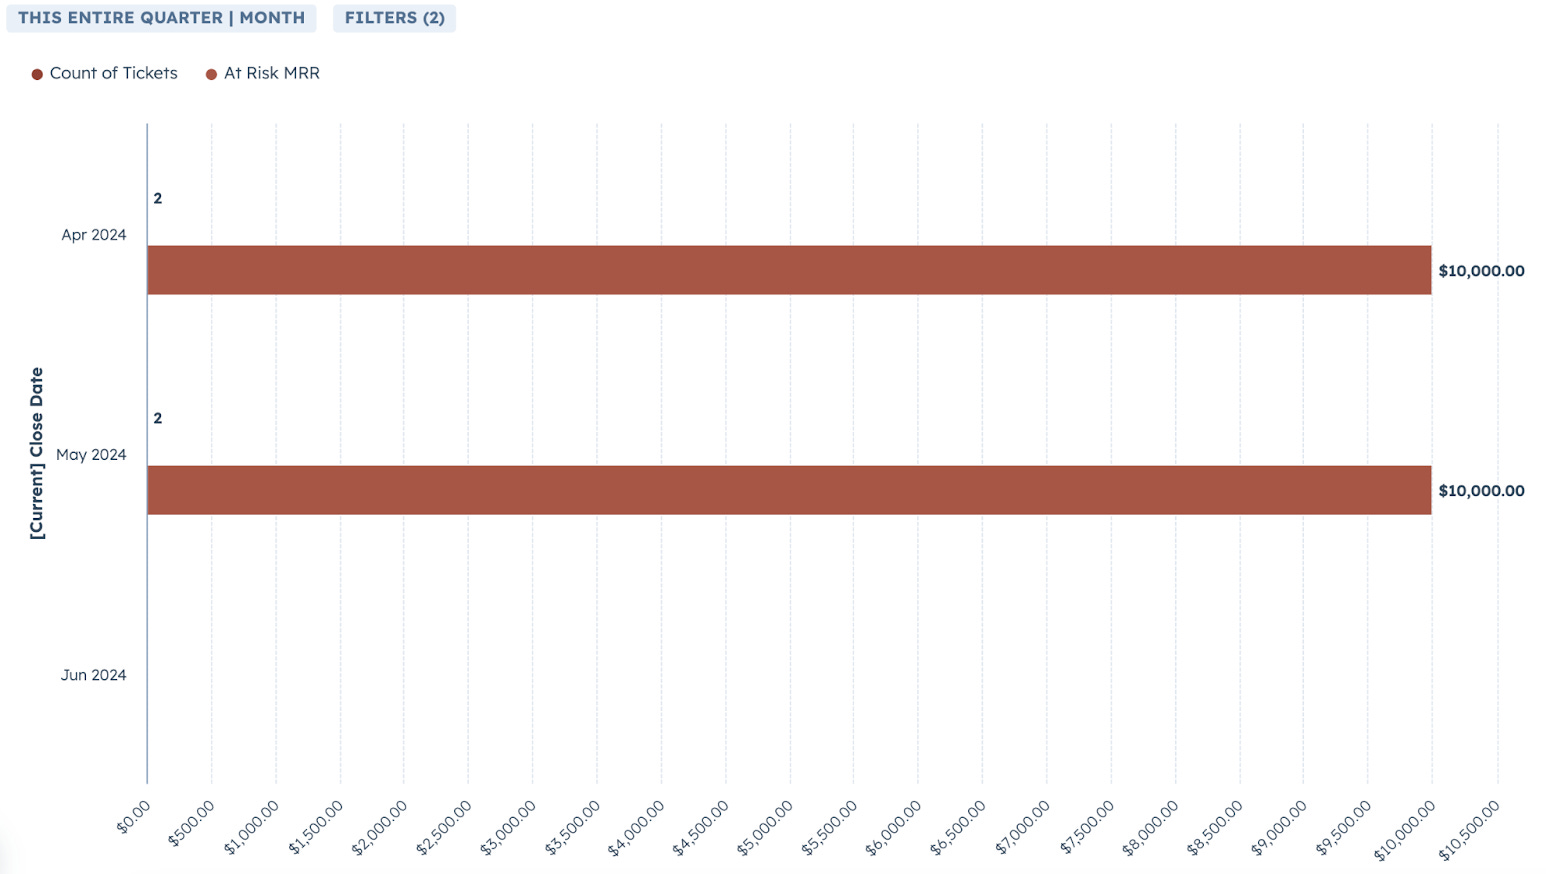
Current Quarter Churn: Provides a snapshot of current churn rates.
This Quarter Churn - Past Close Date: Reveals previous close dates alongside re-adjustments, offering historical context to what the churn was previously.

This Quarter Churn - Past Close Date - Current Close Date Adjusted: Tracks changes from initial adjustments to current close dates, providing a comprehensive view of their evolution.
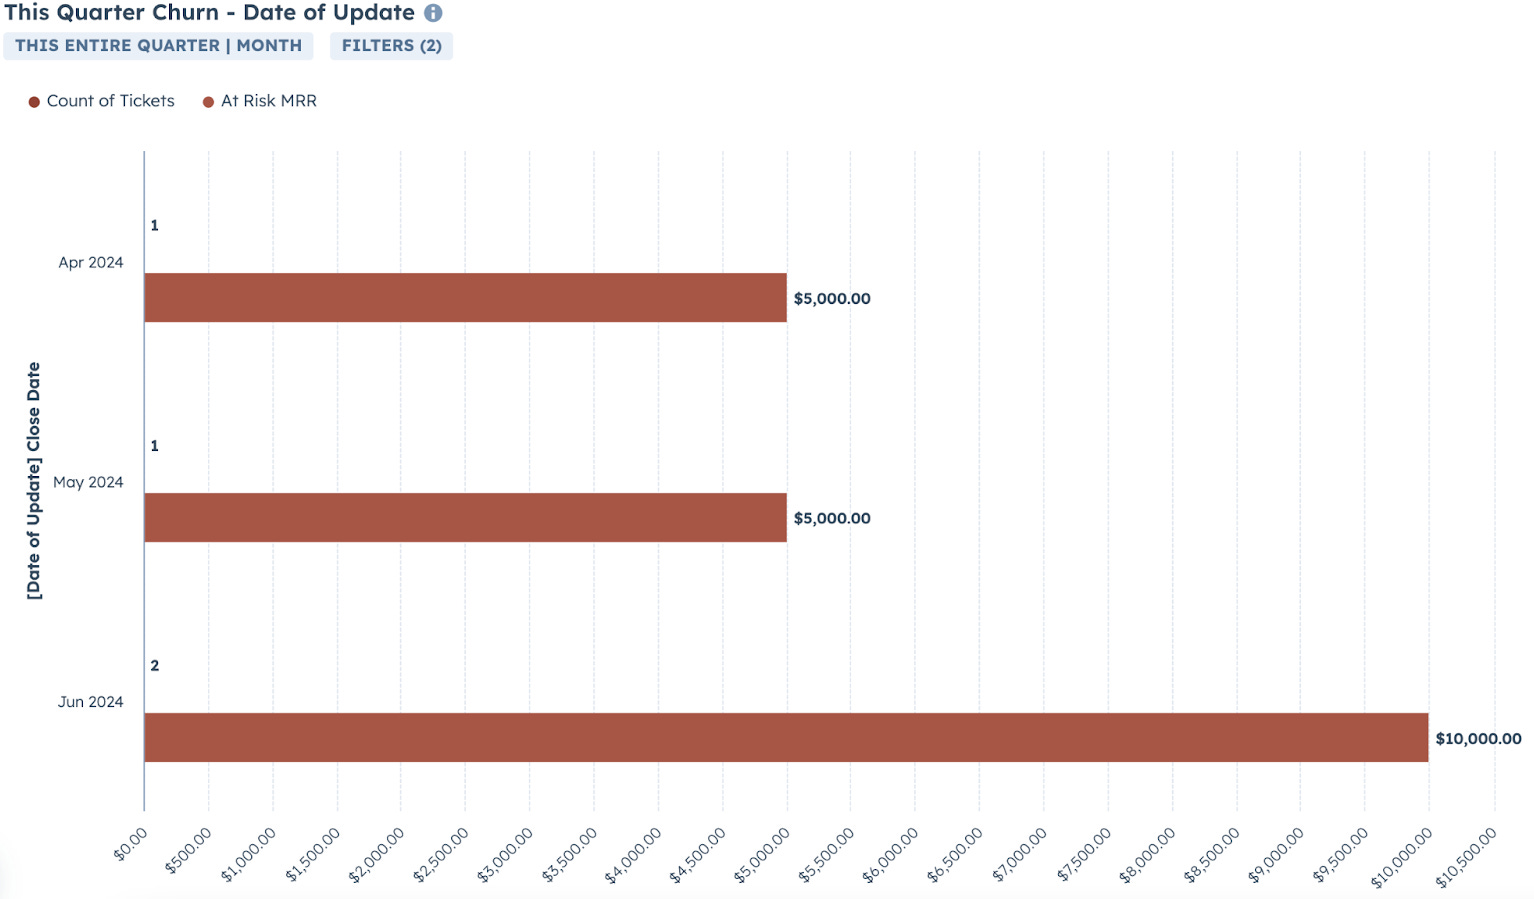
This Quarter Churn - Date of Update: Displays the timeline of update activities by month, facilitating easy access to recent changes.
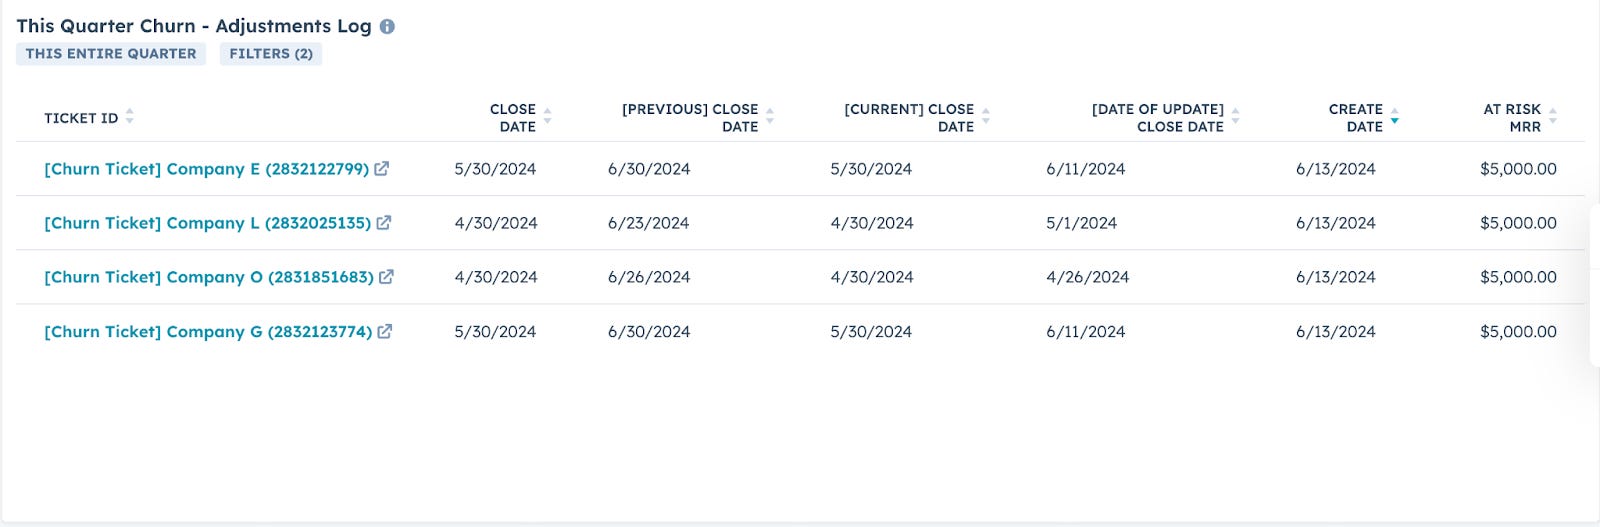
This Quarter Churn - Adjustments Log: A detailed log showcasing all accounts that have undergone adjustments, ensuring transparency and clarity in your data.